Friday, February 19, 2010
Computer E-books
Packed with the most accessible and useful information on the MacBook and written by veteran author Brad Miser, this handy guide shares the most tantalizing techniques intriguing insider tips for getting the most out of your MacBook. Since the release of the first edition, there have been extensive changes to MobileMe and iLife '09 and this fluff-free book encourages you to dive in and get up to speed on all the latest updates.
You'll get the goods on the upcoming release of Mac OS X Snow Leopard as well as tricks on everything from using the desktop with the Dashboard and its widgets to running Windows applications on your MacBook.
* Shares shortcuts and secrets for making the most of Apple's sleek and high-performing portable computer, the MacBook
* Skips the fluff and delivers just the essentials on key topics, including the changes to MobileMe and iLife '09
* Features more than 300 color screen shots and convenient 6x9 trim size travels wherever you go
* Divulges details for running Windows applications and using the desktop with the Dashboard
If you're eager to make the most of your MacBook and interested in sharpening your key skills, then this captivating companion is for you!
INIT-THING
Init means hot . A cebuano dialect which is came from Cebu , called the Queen City of the South which is part of the Philippines. Any way, all stuff here can be write or commented at this section, that you like to share for the purpose of education . Anything part of TV shows like anime , TV Series and also movies. Music is part of our life you can share it here, music gives us a true relax when we heard our favorite songs and also feel like dancing when we heard a music and feel the beat., by the way who ever wants to learn by yourself and trained by yourself , you can find here an e-books which means an electronic books that can you get here and learn by your own readings.
Wednesday, February 17, 2010
Customize a theme in Windows 7
| You can change individual parts of a theme (the desktop background, window color, sounds, and screen saver), and then save the revised theme for your own use or to share with other people. |
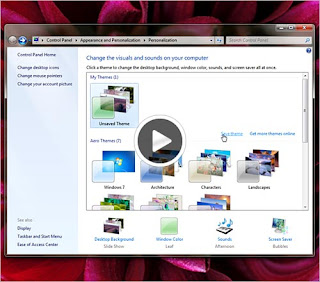
To change parts of a theme
1.Open Personalization by clicking the Start button
 , and then clicking Control Panel. In the search box, type personalization, and then click Personalization.
2. Click the theme that you want to change to apply it to your desktop.
3. Do one or more of the following:
*To change the background, click Desktop Background, select the check box for the image that you want to use, and then click Save changes.
*To change the color of window borders, click Window Color, click the color that you want to use, adjust the intensity, and then click Save changes.
*To change the sounds for the theme, click Sounds, click an item in the Sound Schemes list, and then click OK.
*To add or change a screen saver, click Screen Saver, click an item in the Screen saver list, change any settings that you want to change, and then click OK.
Your revised theme will appear under My Themes as an unsaved theme. If you want to come back to your unsaved theme later, make sure you save it.
___________________________________________________________________________________
Note:
If you upgraded to Windows 7 from Windows XP or Windows Vista, be aware that themes work a little differently in Windows 7. Anytime you change the desktop background, window color, sounds, or screen saver, you're creating a new unsaved theme, not making changes to an existing theme.
___________________________________________________________________________________
To save a revised theme for your use only
To save your revised theme to use on your computer, follow these steps:
1.Open Personalization by clicking the Start button
, and then clicking Control Panel. In the search box, type personalization, and then click Personalization.2.Click your revised theme to apply it to the desktop.
3.Click Save theme.
4.Type a name for your theme, and then click Save.
The theme will appear under My Themes. Note that themes saved this way can't be shared with other people.
To save a revised theme to share with friends and family
To share a revised theme, follow the steps below. You can share your theme using e‑mail, a network, or an external hard disk.
1.Open Personalization by clicking the Start button
, and then clicking Control Panel. In the search box, type personalization, and then click Personalization.2.Click your revised theme to apply it to the desktop.
3.Right-click the theme, and then click Save theme for sharing.
4.In the File name box, type a name for your theme, and then click Save.
By default, Windows saves the theme in your My Documents folder.
___________________________________________________________________________________
Tip:
Double-click a shareable theme to add it to your collection of themes.
___________________________________________________________________________________
How to verify your environment?
| If you don't know what operating system you use in your computer. This is the place will guide you on how to do it. |
Verifying your environment
If we were unable to detect your environment but you know what it is, please click Change your environment at the end of this section and tell us what your environment is.
If you need help verifying your environment, please follow these steps.
To verify your operating system:
1. Click Start or click Start Search, and then click Run.
2. Type msinfo32 in the Open box, and then click OK.
3. Locate your operating system next to the OS Name line.
4. Locate your architecture type next to the System Type line.
To verify your version of Internet Explorer:
1. Start Internet Explorer.
2. Click About Internet Explorer on the Help menu. The version is listed here.
Print or make a note of your environment information, and then tell us what it is by clicking Change your environment, and then clicking to select your environment.
How to Remove IE 8 from Windows 7 Completely

- Enter the Control Panel and find All Control Panel Options
- Click Programs and Features
- In the left sidebar, click Turn Windows Features On or Off (you will be thrown a UAC prompt if you elevated UAC)
- Look for Internet Explorer 8 in the list and uncheck it.
- Click OK. You will see a prompt notifying you of a reboot.
- The machine will reboot once, configure things, and reboot again.
How do I uninstall or remove Internet Explorer 8?
Note If you are not sure which version of Windows that you are running, or if you need help verifying that you are an administrator, click here to determine your environment (http://support.microsoft.com/gp/admin). Important: You cannot uninstall Internet Explorer 8 if it is set as not removable. This occurs if you install Internet Explorer 8 before you install Service Pack 3 (SP3) for Windows XP. If this scenario applies to you, then you must uninstall SP3 before you can uninstall Internet Explorer 8. For more information about this issue. You cannot uninstall Internet Explorer 7 or Internet Explorer 8 after you install Windows XP Service Pack 3 |
Steps for Windows 7
To uninstall Internet Explorer 8, follow these steps:
1. Close all programs.
2. Click Start
Start button
 , and then click Control Panel.
3. Under Programs, click Uninstall a program.
4. In the tasks pane, click Turn Windows features on or off.
5. In the list of windows features, clear the check box next to Internet Explorer 8.
6. You receive a warning message in a pop-up window. Click Yes.
Internet Explorer 8 will now be uninstalled. The system will restart after the installation.
Steps for Windows Vista or for Windows Server 2008
To uninstall Internet Explorer 8, follow these steps:1. Close all programs.
2. Click Start, and then click Control Panel.
3. Click Uninstall a Program under the Programs category
4. In the Tasks pane, click View installed updates.
5. In the list of installed updates, double-click Windows Internet Explorer 8.
Note If Windows Internet Explorer 8 does not appear in the list of installed updates, try the alternative steps for Windows Vista or for Windows Server 2008.
6. In the Uninstall an update dialog box, click Yes.
Note If you are prompted for an administrator password or for confirmation, type the password, or click Continue.
7. Follow the instructions to uninstall Internet Explorer 8.
8. When the uninstall program is finished, restart your computer.
Steps for Windows XP or for Windows Server 2003
To uninstall Internet Explorer 8, follow these steps:
1. Close all programs.
2. Click Start, and then click Control Panel.
3. Click Add or Remove Programs.
4. In the list of currently installed programs, click Windows Internet Explorer 8, and then click Remove.
Note If Windows Internet Explorer 8 does not appear in the list of installed updates, try the alternative steps for Windows XP or for Windows Server 2003.
5. Follow the instructions to uninstall Internet Explorer 8.
6. When the uninstall program is finished, restart your computer.
Tuesday, February 16, 2010
How to setup a home internet connection.
| Setup Home Internet Connection In order to setup your own network with internet connection, firstly you need a PC, modem, and your ISP (Internet Service Provider). With computers getting cheaper and cheaper these days, it is not uncommon for a household to have more than one PC. If that describes you, then you have probably found yourself in the situation where you wished you could access the other PC to retrieve a file, use the printer attached to the other PC, play multi-player computer games, or most importantly share your broadband Internet access such as cable or DSL modem with the other PC. |
As you can see below, Fig. A-1, there is a cloud which is your ISP then connected to your modem then connected to your computer as you can see.

Figure A-1
Your cable/DSL modem plugs straight into the computer. The computer is exposed to the public Internet (indicated by the color red). There is no connection for more than one computer. You only have one IP address from your ISP.
Saturday, February 13, 2010
How to manually remove programs from the Add or Remove Programs tool
| The Currently installed programs list in the Add or Remove Programs tool lists all of the Windows-compatible programs that have an uninstall program or feature. Occasionally, a program may not be removed completely, and the registry key that is used to display the program in the Currently installed programs list remains. In this situation, you may need to manually remove the program from the Currently installed programs list in Add or Remove Programs. To do this, follow these steps. Important This section, method, or task contains steps that tell you how to modify the registry. However, serious problems might occur if you modify the registry incorrectly. Therefore, make sure that you follow these steps carefully. For added protection, back up the registry before you modify it. Then, you can restore the registry if a problem occurs. For more information about how to back up and restore the registry, click the following article number to view the article in the Microsoft Knowledge Base: |
2. In the Open box, type regedt32, and then click OK.
3. In Registry Editor, locate the following registry key:
HKEY_LOCAL_MACHINE\SOFTWARE\Microsoft\Windows\CurrentVersion\Uninstall
4. In the left pane, click the Uninstall registry key, and then click Export on the File menu.
5. In the Export Registry File dialog box that appears, click Desktop in the Save in list, type uninstall in the File name box, and then click Save.
6. Each key listed under Uninstall in the left pane of Registry Editor represents a program that is displayed in the Currently installed programs list of the Add or Remove Programs tool. To determine which program that each key represents, click the key, and then view the following values in the details pane on the right:
DisplayName: The value data for the DisplayName key is the name that is listed in Add or Remove Programs.
-and-
UninstallString: The value data for the UninstallString key is the program that is used to uninstall the program.
7. After you identify the registry key that represents the program that you removed but which is still displayed in the Currently installed programs list of Add or Remove Programs, right-click the key in the left pane of the Registry Editor window, and then click Delete.
Click Yes in response to the "Are you sure you want to delete this key and all of its subkeys?" message.
8. On the File menu, click Exit to quit Registry Editor.
9. Click Start, click Control Panel, and then click Add or Remove Programs.
In the Currently installed programs list, verify that the program whose registry key you deleted is no longer listed.
10. Do one of the following:
* If the program list is not correct in Add or Remove Programs, double-click the Uninstall.reg file that you saved to your desktop in step 5 to restore the original list of programs in the registry.
-or-
* If the program list is correct in Add or Remove Programs, right-click the Uninstall.reg file on your desktop, and then click Delete.
For more information about how to add or remove programs on a Windows XP-based computer, click the following article number to view the article in the Microsoft Knowledge Base:
305548 (http://support.microsoft.com/kb/305548/ ) How to add components and programs to a computer in Windows XP
307895 (http://support.microsoft.com/kb/307895/ ) How to change or remove a program in Windows XP
APPLIES TO
* Microsoft Windows XP Professional x64 Edition
* Microsoft Windows XP Home Edition
* Microsoft Windows XP Professional
Wednesday, February 10, 2010
Switching Classic View or Category View
| The new task-based design of Windows XP makes it easier to use a computer regardless of your experience. But what if you've been using Windows-based computers for years, and prefer some things in the classic design? No problem. You can use the Windows Classic View and use your files and folders exactly as you always have. You can customize your Windows XP-based computer in four ways to restore the classic Windows user interface. • You can switch the Control Panel appearance to Windows Classic View with one click whenever you want it, and restore the new Category View whenever it may be helpful • You can use Folder Options to change all your folders to appear in the Windows Classic View. |
With an easy command-line tip, you can use Windows XP Help in the classic interface
•
With the Windows Classic Theme, you can change the visual design of your desktop, taskbar, and Start menu to resemble the earlier versions of Windows.
Classic View or Category View
Category View In Windows XP, the Control Panel and the Help and Support Center display in Category View. Control Panel, for example, displays nine categories of computer settings, such as Network and Internet connections. Each category includes a list of common and complex tasks, such as Set up or change your Internet connection. Click on the task you want to complete, and Windows XP will open the window you need to complete it.Classic View In the Classic View, a list of files and folders appears in Control Panel. You must know which file or folder to open for your task. If you know, then Classic View can sometimes provide a quicker way to accomplish a task in Control Panel. Figure 1 below shows the Control Panel in Classic View. Figure 2 shows the Control Panel in Category View.

Figure 1. Control Panel in Classic View

Figure 2. Control Panel in Category View
How to remove some unnecessary programs at startup
| Do you have notice whenever you turn on you computer it load forever that you can't wait or load so delayed that you wonder what happen to your computer. And you know that you have a high speed memory installed it , it may be you have tone programs loading at start up that's why you wonder it is very slow at loading. At this rate you need to remove some unnecessary programs at start up. |
First : Click start > then click run > then type msconfig > then press Enter
A pop up window will come out which is System Configuration Utility
Second: Click Startup Tab , then uncheck the some programs that you don't want to
load. See figure 1-A.
After that you will need to restart you PC to take effect some changes you made.

Figure 1-A. Sample of System Configuration Utility
Saturday, February 6, 2010

Friday, February 5, 2010
Fix to enable right click
Some virus attacks result that you cannot get to right click with your desktop it has been disable by some virus.
Well it could be done by a virus and after cleaning the virus . Now you need to enable your right click by fixing the registry.
By fixing it this you can download here
Once you download just double click the file then click ok and restart your computer.
How to disable Autorun.inf
Here’s a simple trick on how to disable your Autorun.inf , there are ways of disabling your Autorun.inf from poping up a window when you insert a flash drive, one way in in GPEDIT.MSC, but it only disable the popup in window, but when you double click your drive, it actually runs your Autorun.inf in the background.
Here’s a way on how to disable your Autorun.inf totally.
1. Go to your Registry Editor by Clicking Start>Run and Type Regedit, or simply Hold Windows Logo+R then type Regedit.
2.) Locate the HKEY_LOCAL_MACHINE\SOFTWARE\Microsoft\Windows NT\CurrentVersion\IniFileMapping\Autorun.inf
if you cant find the Autorun.inf , just Right Click the IniFileMapping, then Click on New>String Value
name it with “@” , and the value Data should be “@SYS:DoesNotExist”
it should look like the picture below.
Restart your PC.
Your PC Should now be safe from viruses that uses autorun.inf
Thursday, February 4, 2010
How to configure TCP/IP
To configure TCP/IP, follow these steps:
1. Click Start, click Control Panel, click Network and Internet Connections, and then click Network Connections.
2. Right-click the network connection that you want to configure, and then click Properties.
3. On the General tab (for a local area connection), or the Networking tab (for all other connections), click Internet Protocol (TCP/IP), and then click Properties.
4. If you want to obtain DNS server addresses from a DHCP server, click Obtain DNS server address automatically.
5. If you want to manually configure DNS server addresses, click Use the following DNS server addresses, and then type the preferred DNS server and alternate DNS server IP addresses in the Preferred DNS server and Alternate DNS server boxes.
Wednesday, February 3, 2010
How to delete unnecessary programs at start up
Deleting unnecessary programs at start up
Even if our computer has a great speed and a big RAM, you always notice that your computer is always at low speed. In order to increase your computer at start up you need to delete some programs while your computer loading at start.
In this way your computer will load at maximum speed. Just follow the following steps.
Method A : Registry Cleaning
Step 1:
Click Start > Run > then type regedit then press Enter
Expand HKEY_LOCAL_MACHINE >Software > Microsoft > Windows > CurrentVersion > Run
Now you can see at the right pane : see example below

Right click your desired data to delete.
Note: Make sure you back up your registry. It is very risky if your doing the wrong thing.
After deleting unnecessary program loading at start up, you may now try to restart your computer. To see if your computer will load fast after turning on.
Tuesday, February 2, 2010
Folder options: View hidden folders and files
Folder options: View hidden folders and files
One of the virus damage of your registry is the files that cannot be unhidden back because your registry has change its state, you probably notice that when go to folder options go to view and then tick the show hidden files and folders then apply but your files doesn't appear.
This time you need to edit your registry first :
Click start > run > type regedit then enter
Browse to this:
[HKEY_LOCAL_MACHINE\SOFTWARE\Microsoft\Windows\CurrentVersion\Explorer\Advanced\Folder\Hidden]
Look at the value of Hidden Key:

Look at the value of Showall Key:

Just copy the value of CheckedValue and DefaultValue.
That's it..
How to unhide files and folders.
Solution to Unhide Files and Folders
Nowadays virus attack can be anytime and anywhere. Every virus has its own way of attacking on how they do damage your computer, change your settings, add or delete some registry of your PC. One of this is they make changes the properties of your folders or files by hiding it and make their own look a like folders but it is not a folder but it is totally an application that hiding the icon image of a folder. When you experience that by clicking the folder that no happen , when you open it you cannot open , no folder opening or making new folder and you can not open it, in that way your original files and folders is being hide by a virus.
So in this state you might need help but before anything else you need to kill this virus first. I will teach you now on how to do it.
For folders and files:
>Click start > run > type "cmd"
then type the command: attrib d:\*.* /d /s -h -r -s then Enter
Then all folders and files will be seen shortly..
For files only:
>Click start > run > type "cmd"
then type the command: attrib filename -h -r -s -a then Enter
Then all files will be seen shortly..
How to Change IP Address with Proxy Server?
How to Change IP Address with Proxy Server?
(For Internet Explorer only)
If you want to access blocked sites or sites from which you have been banned you have to change IP address.
For that purpose, you may use Proxy Server. Firstly, you need to find an anonymous proxy server and set it up in a browser.
You can use the following list of proxies or any other one.
Change IP address with a Proxy Server in Internet Explorer:
1. Tools -> Internet Options -> Connections

2. Choose a connection you use and press the button "Settings"
3. In the section "Proxy Server" tick the box "Use a proxy server"

4. Enter in your proxy server in the window shown.
5. Click the button "OK" twice.
E.g. Your Proxy Server looks like: 123.456.789:3128 or example.com:8080.
The numbers before a "colon" - Proxy Server address. The numbers after "colon" - Proxy Server port.
Therefore, put the address in the left window (123.456.789 or example.com) and the port in the right window (3128 or 8080).
Now Check IP Address for FREE.
If your IP address is not changed, try to use another Proxy Server to change IP address again.
How to Remove W32/Sality.AE
Remove W32/Sality.AE
1. Disconnected your computer from the network.
2. Turn off “System Restore” when in cleaning process.
3. Turn off “Autorun” and “Default Share” download this file right click on it then choose install.
4. Kill active process in your computer backround and checking your startup file you can use hijackthis.
5. Scan with Norman Malware Cleaner please note because this virus will infected files with extesion .exe com and .scr you have to rename Norman_Malware_Cleaner.exe with new extension example Norman_Malware_Cleaner.cmd
please make sure you downloaded fresh new cleaner from norman official website and don’t run it before you change the extension or this cleaner will gotinfected first before he can eliminate sality.
6. For repair your computer to booting in safe mode please download this file and merge only one that same with your windows version.
7. Repair your registry using this file right click on it then choose install.
8. Reboot your computer and scan again with norman malware cleaner, after that reboot again to make sure your system clean.
That's it.
Subscribe to:
Posts (Atom)